mirror of
https://github.com/metafy-social/python-scripts.git
synced 2025-02-27 18:38:42 +00:00
104 lines
7.7 KiB
Markdown
104 lines
7.7 KiB
Markdown
|
|
# Realtime-chat-app-using-Django
|
|||
|
|
Chat Room has been the most basic step toward creating real-time and live projects. The chat page that we will create will be a simple HTML boilerplate with a simple h1 text with the name of the current user and a link to log out to the user who is just logged in. You may need to comment on the line until we create auth system for this
|
|||
|
|
|
|||
|
|
> Prerequisites:
|
|||
|
|
|
|||
|
|
* Django
|
|||
|
|
* Django Migrations
|
|||
|
|
* Django Channel
|
|||
|
|
|
|||
|
|
# Steps for creating the chat application:
|
|||
|
|
**Step 1:** [Install](https://www.geeksforgeeks.org/django-introduction-and-installation/#:~:text=activate-,Install%20Django,-%2D%20Install%20django) and setup Django
|
|||
|
|
|
|||
|
|
**Step 2:** Create your [virtual environment](https://www.geeksforgeeks.org/python-virtual-environment/).
|
|||
|
|
|
|||
|
|
**Step 3:** Then create a Django project named ChatApp. For creating the project write the command in your terminal.
|
|||
|
|
```sh
|
|||
|
|
django-admin startproject ChatApp
|
|||
|
|
```
|
|||
|
|
**Step 4:** Clone the repository
|
|||
|
|
|
|||
|
|
**Step 5:** Install django-channels for working with the chat app. This will install channels to your environment.
|
|||
|
|
```sh
|
|||
|
|
python -m pip install -U channels
|
|||
|
|
```
|
|||
|
|
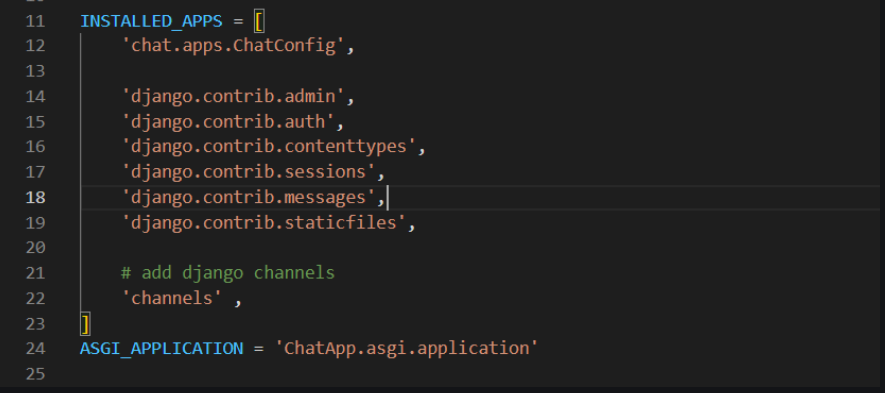
**Step 6:** After installing channels, add channels to your installed apps. This will let Django know that channels had been introduced in the project and we can work further.
|
|||
|
|
> PYTHON 3
|
|||
|
|
```sh
|
|||
|
|
INSTALLED_APPS = [
|
|||
|
|
'chat.apps.ChatConfig',
|
|||
|
|
|
|||
|
|
'django.contrib.admin',
|
|||
|
|
'django.contrib.auth',
|
|||
|
|
'django.contrib.contenttypes',
|
|||
|
|
'django.contrib.sessions',
|
|||
|
|
'django.contrib.messages',
|
|||
|
|
'django.contrib.staticfiles',
|
|||
|
|
|
|||
|
|
# add django channels
|
|||
|
|
'channels' ,
|
|||
|
|
]
|
|||
|
|
|
|||
|
|
```
|
|||
|
|
**Step 7:** Set the ASGI application to your default ASGI file in the project. Now run the server, you will notice that the ASGI server will take place over the Django server and it will support ASGI now.
|
|||
|
|
```sh
|
|||
|
|
ASGI_APPLICATION = 'ChatApp.asgi.application'
|
|||
|
|
```
|
|||
|
|
To run the server, write the following command in the terminal.
|
|||
|
|
```sh
|
|||
|
|
python manage.py runserver
|
|||
|
|
|
|||
|
|
```
|
|||
|
|

|
|||
|
|
|
|||
|
|
**Step 8:** Create a new app that will have all the chat functionality. To create an app write a command in the terminal.
|
|||
|
|
```sh
|
|||
|
|
python manage.py startapp chat
|
|||
|
|
```
|
|||
|
|
And add your app to the installed apps in settings.py.
|
|||
|
|
|
|||
|
|

|
|||
|
|
|
|||
|
|
**Step 9:** Clone the files in your chat app
|
|||
|
|
* chat/urls.py: This will route the Django application to different views in the app.
|
|||
|
|
* Create a templates folder: Inside your app, create two files inside the template/chat named chat.Page.html, and LoginPage.html.
|
|||
|
|
* routing.py: This will route the WebSocket connections to the consumers.
|
|||
|
|
* consumers.py: This is the file where all the asynchronous functionality will take place
|
|||
|
|
|
|||
|
|
**Step 10:** Firstly migrate your database.
|
|||
|
|
```sh
|
|||
|
|
python manage.py makemigrations
|
|||
|
|
```
|
|||
|
|
```sh
|
|||
|
|
python manage.py migrate
|
|||
|
|
```
|
|||
|
|
|
|||
|
|
**Step 11:** Open routing.py and create a route for ChatConsumer (which we will be creating in the next step). Now we have two types of routings in the project. First is urls.py which is for the native Django routing of URLs, and another is for the WebSockets for ASGI support of Django.
|
|||
|
|
|
|||
|
|
**Step 12.** Open consumers.py will handle the events, like onmessage event, onopen event, etc, We will see these events in chatPage.html where we have created the socket connection.
|
|||
|
|
|
|||
|
|
Code explanation:
|
|||
|
|
|
|||
|
|
* class ChatConsumer(AsyncWebsocketConsumer): Here we are creating a class named ChatConsumer which inherits from AsyncWebsocketConsumer and is used to create, destroy and do a few more things with WebSockets. And here we are creating ChatSocket for the required purpose.
|
|||
|
|
* async def connect(self): This function works on the websocket instance which has been created and when the connection is open or created, it connects and accepts the connection. It creates a group name for the chatroom and adds the group to the channel layer group.
|
|||
|
|
* async def disconnect(): This just removes the instance from the group.
|
|||
|
|
* async def receive(): This function is triggered when we send data from the WebSocket ( the event for this to work is: send ), this receives the text data which has been converted into the JSON format ( as it is suitable for the javascript ) after the text_data has been received, then it needs to be spread out to the other instances which are active in the group. we retrieve the message parameter which holds the message and the username parameter which was sent by the socket via HTML or js. This message which is received will be spread to other instances via the channel_layer.group_send() method which takes the first argument as the roomGroupName that to which group this instance belongs and where the data needs to be sent. then the second argument is the dictionary which defines the function which will handle the sending of the data ( “type”: “sendMessage” ) and also dictionary has the variable message which holds the message data.
|
|||
|
|
* async def sendMessage(self, event): This function takes the instance which is sending the data and the event, basically event holds the data which was sent via the group_send() method of the receive() function. Then it sends the message and the username parameter to all the instances which are active in the group. And it is dumped in JSON format so that js can understand the notation. JSON is the format ( Javascript object notation)
|
|||
|
|
|
|||
|
|
**Step 13:** Write the below code in your asgi.py for making it work with sockets and creating routings.
|
|||
|
|
We usually work with wsgi.py which is in the standard Django without any asynchronous support. But here we are using asynchronous channels. So we have to define the routings in a different way than URLs. For HTTP we define that use the normal application which we were already using, now we have introduced another protocol, that is ws ( WebSocket ) for which you have to route. The ProtocolTypeRouter creates routes for different types of protocols used in the application. AuthMiddlewareStack authenticates the routes and instances for the Authentication and URLRouter routes the ws ( WebSocket connections ). The protocol for WebSockets is known as “ws”. For different requests we use HTTP.
|
|||
|
|
|
|||
|
|
Here the router routes the WebSocket URL to a variable in the chat app that is “websocket_urlpatterns” and this variable holds the routes for the WebSocket connections.
|
|||
|
|
|
|||
|
|
**Step 14:** This code defines the channel layer in which we will be working and sharing data. For the deployment and production level, don’t use InMemoryChannelLayer, because there are huge chances for your data leakage. This is not good for production. For production use the Redis channel.
|
|||
|
|
|
|||
|
|
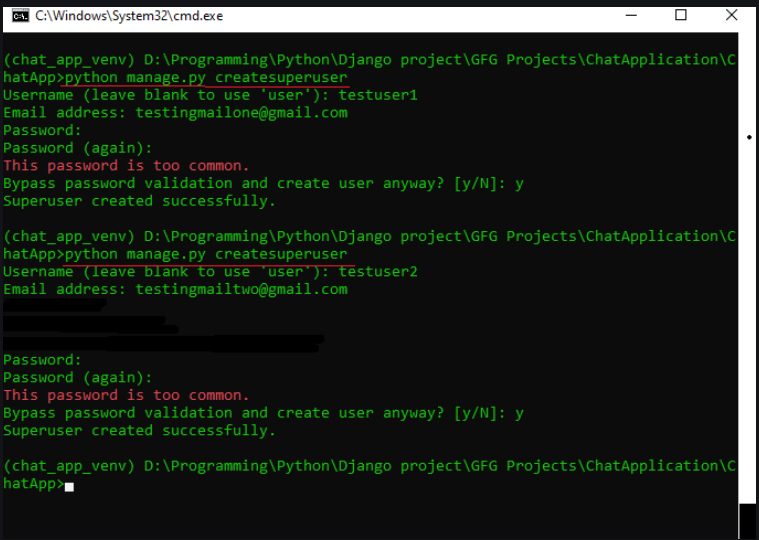
**Step 15:** Now, we need to create 2 users for that we will use “python manage.py createsuperuser” command which creates a superuser in the system.
|
|||
|
|
|
|||
|
|

|
|||
|
|
|
|||
|
|
**Step 16:** We have set the parameter LOGIN_REDIRECT_URL = “chat-page”, this is the name of our landing page URL. This means that whenever the user gets logged in, he will be sent to the chatPage as a verified user and he is eligible to chat through. Now similarly we need to set up the LOGOUT_REDIRECT_URL for the site.
|
|||
|
|
|
|||
|
|
## Finally Deployment
|
|||
|
|
Now, run your server and move to the site and start two different browsers to log into two other users. It is because if you have logged in with first user credentials, the login details are stored in the cookies, then if you log in from second user details in the same browser even with different tabs, So, you cannot chat with two other users in the same browser, that’s why to use two different browsers.
|
|||
|
|
|